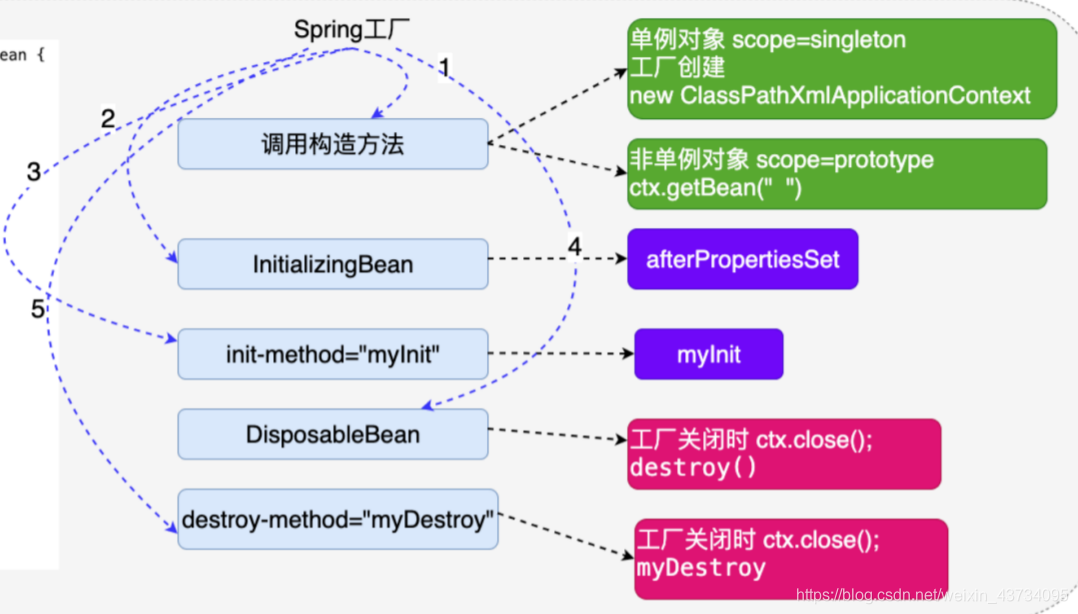
对象的生命周期 什么是对象的生命周期?
为什么要学习对象的生命周期?
由 Spring 负责对象的 创建、存活、销毁 ,了解⽣命周期,有利于我们使用好 Spring 为我们创建的对象。
生命周期的 3 个阶段:
创建阶段 Spring 工厂何时创建对象?
scope="prototype":Spring 工厂在获取对象 ctx.getBean("xxx") 的同时,创建对象。scope="singleton":Spring 工厂创建的同时,创建对象。<bean lazy-init="true"/> 也可以实现工厂获取对象的同时,创建对象。
初始化阶段 什么时候?Spring 工厂在创建完对象后,调用对象的初始化方法,完成对应的初始化操作。
提供初始化方法的两种方式:
1
2
3
4
5
6
7
8
public class Product implements InitializingBean @Override public void afterPropertiesSet () throws Exception System.out.println("Product.afterPropertiesSet" ); } } 1234567
对象中提供一个普通的初始化方法,配置文件种配置 init-method:
1
2
3
4
5
6
7
8
public class Product public void myInit () System.out.println("Product.myInit" ); } } 12345 <bean id="product" class "com.yusael.life.Product" init-method="myInit" /> 1
初始化操作的细节分析:
如果⼀个对象既实现 InitializingBean 同时⼜提供的 普通的初始化方法,执行顺序?InitializingBean,再执行 普通初始化方法。
注入⼀定发⽣在初始化操作的前面。
初始化操作到底是什么?
销毁阶段 Spring 销毁对象前,会调用对象的销毁方法,完成销毁操作。ctx.close();
开发流程与初始化操作一样,提供销毁方法的两种方式:
1
2
3
4
5
6
7
8
public class Product implements DisposableBean @Override public void destroy () throws Exception System.out.println("Product.destroy" ); } } 1234567
对象中提供一个普通的销毁方法,配置文件种配置 destroy-method:
1
2
3
4
5
6
7
8
9
public class Product public void myDestory () System.out.println("Product.myDestory" ); } } 123456 <bean id="product" class "com.yusael.life.Product" destroy-method="myDestory" /> 1
销毁阶段细节分析 :
销毁方法的操作只适用于 scope="singleton",初始化操作都适用。
销毁操作到底是什么?io.close()、connection.close()、…
对象的生命周期总结 1 2 3 4 5 6 7 8 9 10 11 12 13 14 15 16 17 18 19 20 21 22 23 24 25 26 27 28 29 30 31 32 33 34 35 36 37 38 39 40 41 42 public class Product implements InitializingBean , DisposableBean private String name; public String getName () return name; } public void setName (String name) System.out.println("Product.setName" ); this .name = name; } Product() { System.out.println("Product.Product" ); } public void myInit () System.out.println("Product.myInit" ); } @Override public void afterPropertiesSet () throws Exception System.out.println("Product.afterPropertiesSet" ); } public void myDestory () System.out.println("Product.myDestory" ); } @Override public void destroy () throws Exception System.out.println("Product.destroy" ); } } 12345678910111213141516171819202122232425262728293031323334353637 <bean id="product" class "com.yusael.life.Product" init-method="myInit" destroy-method="myDestory" > <property name="name" value="yusael" /> </bean> 123
配置文件参数化 配置文件参数化 :把 Spring 配置文件中需要经常修改的字符串信息,转移到⼀个更小的配置文件中。
Spring 的配置文件中是否存在需要经常修改的字符串?
经常变化字符串,在 Spring 的配置文件中,直接修改不利于项目维护(修改)
转移到⼀个小的配置文件(.properties)利于维护(修改)
优点:利于 Spring 配置文件的维护(修改)
配置文件参数的开发步骤
提供⼀个小的配置文件(.properities)
1
2
3
4
5
jdbc.driverClassName = com.mysql.jdbc.Driver jdbc.url = jdbc:mysql://localhost:3306/spring?useSSL=false jdbc.username = root jdbc.password = 1234 1234
1 2 3 4 <context:property-placeholder location ="classpath:/db.properties" /> 123
在 Spring 配置文件中通过 ${key} 获取小配置文件中对应的值:
1 2 3 4 5 6 7 <bean id ="conn" class ="com.yusael.factorybean.ConnectionFactoryBean" > <property name ="driverClassName" value ="${jdbc.driverClassName}" /> <property name ="url" value ="${jdbc.url}" /> <property name ="username" value ="${jdbc.username}" /> <property name ="password" value ="${jdbc.password}" /> </bean > 123456
自定义类型转换器 类型转换器 作用:Spring 通过 类型转换器 把 配置文件 中 字符串 类型的数据,转换成了对象中成员变量对应类型的数据,进而完成了注入。
自定义类型转换器 产生原因:当 Spring 内部没有提供特定类型转换器时,而程序员在应用的过程中还需要使用,那么
[开发步骤] :
类 implements Converter 接口
1
2
3
4
5
6
7
8
9
10
11
12
13
14
15
16
17
18
19
20
21
22
23
24
public class MyDateConverter implements Converter <String , Date > @Override public Date convert (String source) Date date = null ; try { SimpleDateFormat sdf = new SimpleDateFormat("yyyy-MM-dd" ); date = sdf.parse(source); } catch (ParseException e) { e.printStackTrace(); } return date; } } 1234567891011121314151617181920212223
在 Spring 的配置文件中进行配置;MyDateConverter 对象,再注册类型转换器;
1 2 3 4 5 6 7 8 9 10 11 12 13 14 15 16 <bean id ="myDateConverter" class ="com.yusael.converter.MyDateConverter" /> <bean id ="conversionService" class ="org.springframework.context.support.ConversionServiceFactoryBean" > <property name ="converters" > <set > <ref bean ="myDateConverter" /> </set > </property > </bean > <bean id ="good" class ="com.yusael.converter.Good" > <property name ="name" value ="zhenyu" /> <property name ="birthday" value ="2012-12-12" /> </bean > 123456789101112131415
自定义类型转换器细节
MyDateConverter 中的日期的格式 ,通过 依赖注入 的方式,由配置文件完成赋值。
1
2
3
4
5
6
7
8
9
10
11
12
13
14
15
16
17
18
19
20
21
22
23
24
25
26
27
28
29
30
public class MyDateConverter implements Converter <String , Date > private String pattern; @Override public Date convert (String source) Date date = null ; try { SimpleDateFormat sdf = new SimpleDateFormat(pattern); date = sdf.parse(source); } catch (ParseException e) { e.printStackTrace(); } return date; } public String getPattern () return pattern; } public void setPattern (String pattern) this .pattern = pattern; } } 123456789101112131415161718192021222324 <!-- 配置文件完成对日期格式的赋值 --> <bean id="myDateConverter" class "com.yusael.converter.MyDateConverter" > <property name="pattern" value="yyyy-MM-dd" /> </bean> 1234
ConversionSeviceFactoryBean 定义 id属性,值必须是 conversionService;
1 2 3 4 5 6 7 8 <bean id ="conversionService" class ="org.springframework.context.support.ConversionServiceFactoryBean" > <property name ="converters" > <set > <ref bean ="myDateConverter" /> </set > </property > </bean > 1234567
Spring 框架其实内置了日期类型的转换器:日期格式必须是 2020/05/01。
1 2 3 4 5 <bean id ="good" class ="com.yusael.converter.Good" > <property name ="name" value ="zhenyu" /> <property name ="birthday" value ="2012/12/12" /> </bean > 1234
后置处理 Bean BeanPostProcessor 作用:对 Spring 工厂所创建的对象,进行再加工。(AOP 的底层实现)
后置处理 Bean 原理分析 BeanPostProcessor 接口中规定的两个方法:
1
2
3
4
public Object postProcessBeforeInitialization (Object bean, String beanName) return bean; } 123
作用:Spring 创建完对象,并进行注入后 ,可以运行 Before ⽅法进行加工;
通过方法的参数获得 Spring 创建好的对象,最终通过返回值交给 Spring 框架。
1
2
3
4
public Object postProcessAfterInitialization (Object bean, String beanName) return bean; } 123
作⽤:Spring 执行完对象的初始化操作后 ,可以运行 After ⽅法进行加工;
通过方法的参数获得 Spring 创建好的对象,最终通过返回值交给 Spring 框架。
实战中:很少处理 Spring 的初始化操作,没有必要区分 Before,After。只需要实现其中一个,建议是 After 方法即可。
BeanPostProcessor 开发步骤
类 实现 BeanPostProcessor 接口
1
2
3
4
5
6
7
8
9
10
11
12
13
14
public class MyBeanPostProcessor implements BeanPostProcessor @Override public Object postProcessBeforeInitialization (Object bean, String beanName) throws BeansException return null ; } @Override public Object postProcessAfterInitialization (Object bean, String beanName) throws BeansException Category category = (Category) bean; category.setName("yusael" ); return category; } } 12345678910111213
Spring 配置文件中进行配置
1 2 <bean id ="myBeanPostProcessor" class ="com.yusael.beanpost.MyBeanPostProcessor" /> 1
细节 :BeanPostProcessor 会对 Spring 工厂创建的所有对象 进行加工。如果工厂创建了多个不同的对象,要注意区别传入的对象:
1
2
3
4
5
6
7
8
9
@Override public Object postProcessAfterInitialization (Object bean, String beanName) throws BeansException if (bean instanceof Category) { Category category = (Category) bean; category.setName("yusael" ); return category; } return bean; }
学习资料:B站孙帅


